PuTTY & Pageant
Created by Potthoff, Sebastian last modified on 06. Nov 2024
You can download PuTTY from https://www.putty.org/ and install it on your machine.
PuTTY
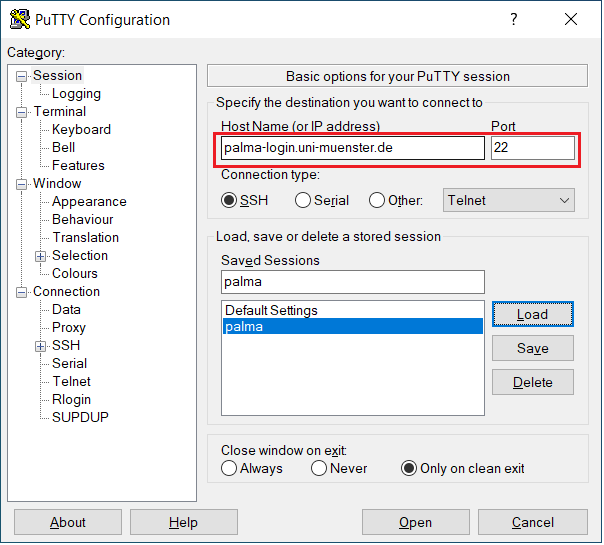
- DestinationHost When you start PuTTY, in the Session menu, you can add the hostname of the palma login node: palma-login.uni-muenster.de
- The port will be 22
- You can already type in a name for the new session you want to create (below Saved Sessions) and click Save.
- Users
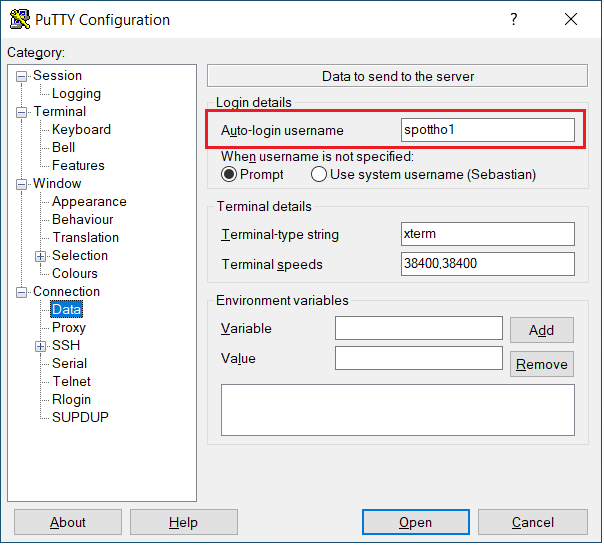
- In the Connections - Data menu, add your university ID as the login username

- Private SSH Key
- In the Auth - Credential menu, add your private ssh key
 4. Optional SSH Jumphost
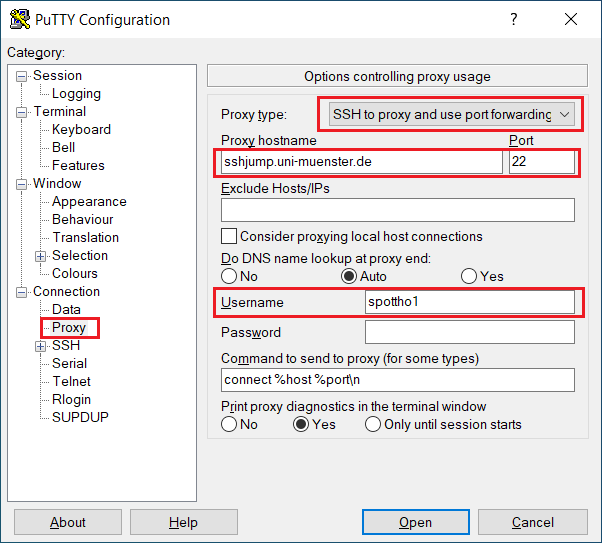
- if you want to connect to the login node from outside of the university network, you can do so by using a so called jumphost.
- The jumphost can be configured in the Connection - Proxy menu
- For Proxy type, select SSH to proxy and use port forwarding
- Add the hostname of the jumphost: sshjump.uni-muenster.de
- Set the port to 22
- Add your university ID as the username
4. Optional SSH Jumphost
- if you want to connect to the login node from outside of the university network, you can do so by using a so called jumphost.
- The jumphost can be configured in the Connection - Proxy menu
- For Proxy type, select SSH to proxy and use port forwarding
- Add the hostname of the jumphost: sshjump.uni-muenster.de
- Set the port to 22
- Add your university ID as the username
If you want to use the Jumphost, you also have to add the private key to Pageant (a tool which also installs with PuTTY) See next section for details.
- Saving the Session and connecting to the login node
- Go back to the Session menu and Save your current session to not loose all the settings you just made.
- You can then click on Open to connect to the login node
- The first time you login, you will be asked to accept the connections to the host
- You will also be asked to type in your password for the SSH key.
Pageant
 - Pageant is a small utility to manage your SSH keys
- When you start the tool (search via the Windows Search bar), it will only show a system icon in the taskbar
- Pageant is a small utility to manage your SSH keys
- When you start the tool (search via the Windows Search bar), it will only show a system icon in the taskbar

- Right-Click on the icon and click on Add Key
- Add your private key file
You should now be able to connect to the PALMA login node using PuTTY via the Jumphost if you configured it as explained in step 5 above.